 flaticon.com
Network PXE Boot Without WDS | UniFi

Table of Contents
INTRO
We can configure network booting with PXE without WDS utilizing DHCP custom options 66 and 67. This is however not best practice, has issues, limitations, and is annoying to deal with. I did get it working and this guide will discuss that process. This is mainly for me so I don’t forget what I learned because this is for legacy BIOS booting only and does not apply to UEFI booting.
PREREQUISITES
So in this guide we’re going to need some things.
- DHCP server with ability to set Option 66 and Option 67. (I will be using a UniFi Dream Machine Pro)
- TFTP server software. I will be using SolarWinds TFTP Server, free download just fill in the form with dummy values and it will give you the download link at the end.
- A Hyper-V Generation 1 VM or computer that supports legacy BIOS network booting.
- Note: You must add a Legacy Network Adapter hardware in the VM’s properties for PXE network booting, the default Network Adapter will not work.
- Appropriate boot files, install an evaluation copy of Windows Server and install WDS to get the files.
- I explain this in more detail further down.
GETTING STARTED
Have your Windows client with SolarWinds TFTP Server installed and configured with a static IP or DHCP reservation. Here are a couple things to note.
- The directory C:\TFTP-Root is the default path and where we will be hosting our files. The directory does not need to be shared over the network or have any special NTFS permissions.
- Configure the Windows Firewall to be Enabled but to Allow All on Inbound and Outbound for Domain and Private profiles.
- Configure connections to SolarWinds TFTP Server to be limited to your local LAN subnet for security within the software.
- Make sure the network connection profile is NOT set to Public.
- Many times Windows will assume the profile of Public for a connected network adapter, preventing communication. Change it to Private. Here is a PowerShell command to fix it.
Set-NetConnectionProfile -InterfaceAlias "Ethernet" -NetworkCategory PrivateBOOT FILES
This is the complicated part. There is a variety of files we need to grab, we get part of them by installing WDS on an evaluation copy of Windows Server and when we configure WDS the boot files will be created and saved at C:\RemoteInstall.
The directory C:\RemoteInstall will include the following we will need:
- boot.sdi
The directory C:\RemoteInstall\x64 will include the following we will need:
- abortpxe.com
- bootmgfw.efi
- bootmgr.exe
- default.bcd
- hdlscom1.com
- hdlscom1.n12
- hdlscom2.com
- hdlscom2.n12
- pxeboot.com
- pxeboot.n12
- wdsnbp.com
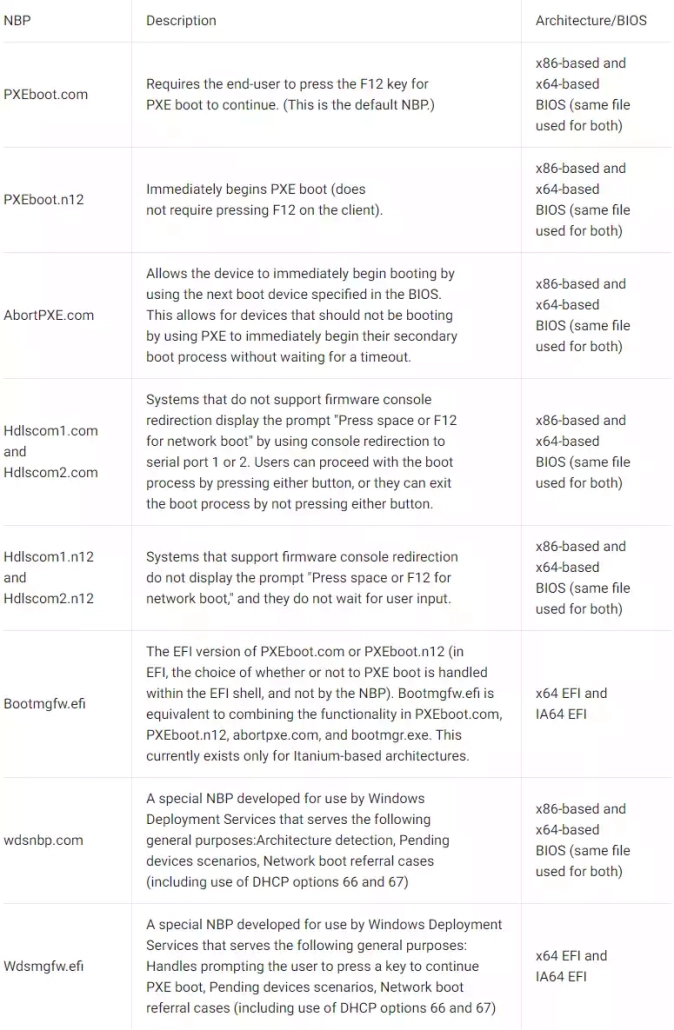
Copy all of these files to the directory C:\TFTP-Root\Boot on your TFTP server. If you want to learn more about these files there is a good table at the following link here. I also added an image of it.
Take your time to read the table and understand the purpose of each files as this can help with any troubleshooting. While this guide is for legacy booting, if you come here trying to solve your UEFI booting issues by chance this table can be helpful.
UNIFI DHCP SERVER OPTIONS
The thing is because we aren’t using WDS for our server we need to understand the various files needed to complete the booting process. In the UniFi console we configure Network Boot (Option 66 and Option 67) in the UniFi DHCP Server settings. In my example my TFTP server is on 192.168.1.100 which configures Option 66 and then Option 67 is set to:
\boot\wdsnbp.com
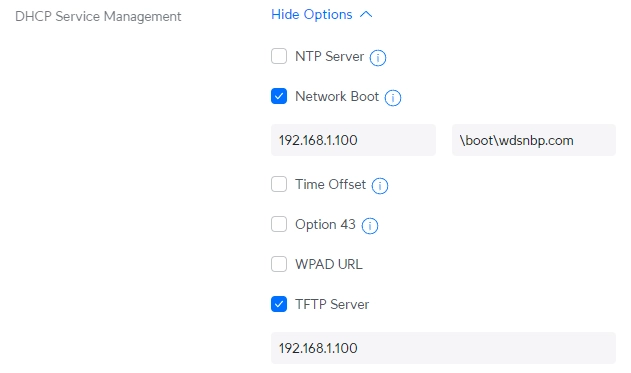
For reference, Option 67 is mapped to C:\TFTP-Root\Boot\wdsnbp.com on my TFTP server. When wdsnbp.com is pulled down to the client the next following files are pulled.
- pxeboot.com
- bootmgr.exe
- BCD
- The Boot Configuration Data (BCD) file needs to be configured for a RAMDisk configuration and contains the path to boot.sdi and boot.wim files, more on this below.
- boot.sdi
- boot.wim
- Fonts and secure boot and boot policy files.
- We don’t really need these from my experience.
VISUAL BCD EDITOR
To create your own Boot Configuration Data (BCD) you can edit the default.bcd file and rename it to BCD once finished. You can also read documentation here but the way I edit the file is to download and use Visual BCD, here.
BCD Store | {bootmgr} | Values
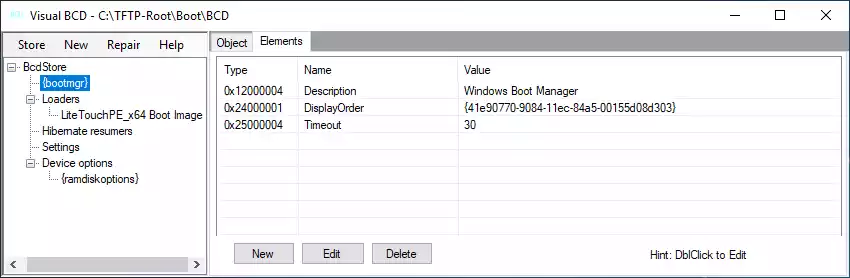
BCD Store | Loaders | Values
- As you can see I am using a LiteTouchPE image from MDT which will be renamed to boot.wim and located at the path below. For your reference, it will be located in C:\TFTP-Root\Boot on my TFTP server.

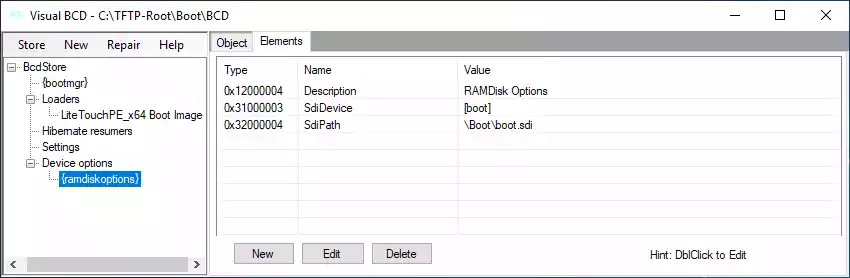
BCD Store | {ramdiskoptions} | Values
- Location of boot.sdi. For your reference, it will be located in C:\TFTP-Root\Boot on my TFTP server.
So as you can see, not very simple.
CREATE BCD STORE WITH CMD
If you don’t want to use Visual BCD editor or other third-party programs you can use the Windows command line using bcdedit.exe. Here is a script below:
# Create a BCD store using bcdedit.exe:

bcdedit /createstore C:\TEMP\BCD

# Configure RAMDISK settings:

bcdedit /store C:\TEMP\BCD /create {ramdiskoptions} /d "RAMDisk Options"
bcdedit /store C:\TEMP\BCD /set {ramdiskoptions} ramdisksdidevice boot
bcdedit /store C:\TEMP\BCD /set {ramdiskoptions} ramdisksdipath \Boot\boot.sdi
bcdedit /store C:\TEMP\BCD /create /d "Windows Boot Image" /application osloader

# The last command will return a GUID, for example:

# The entry {cd4acce3-ef87-11e6-ada6-f8b156ae2ab6} was successfully created.

# Copy this GUID for use in the next set of commands. In each command shown, replace "GUID1" with your GUID.

# Create a new boot application entry for the Windows Boot Image:

bcdedit /store C:\TEMP\BCD /set {GUID1} device ramdisk=[boot]\Boot\boot.wim,{ramdiskoptions}
bcdedit /store C:\TEMP\BCD /set {GUID1} path \Windows\system32\winload.exe
bcdedit /store C:\TEMP\BCD /set {GUID1} osdevice ramdisk=[boot]\Boot\boot.wim,{ramdiskoptions}
bcdedit /store C:\TEMP\BCD /set {GUID1} systemroot \Windows
bcdedit /store C:\TEMP\BCD /set {GUID1} detecthal Yes
bcdedit /store C:\TEMP\BCD /set {GUID1} winpe Yes

# Configure BOOTMGR settings (remember to replace GUID1 in the third command with your GUID):

bcdedit /store C:\TEMP\BCD /create {bootmgr} /d "Windows Boot Manager"
bcdedit /store C:\TEMP\BCD /set {bootmgr} timeout 30
bcdedit /store C:\TEMP\BCD -displayorder {GUID1} -addlast
VERIFYING BOOT FILES
Now that you have your BCD file created these are the following files you will want in your C:\TFTP-Root\Boot directory on your TFTP server:
- abortpxe.com
- BCD
- boot.sdi
- boot.wim
- bootmgfw.efi
- bootmgr.exe
- hdlscom1.com
- hdlscom1.n12
- hdlscom2.com
- hdlscom2.n12
- pxeboot.com
- pxeboot.n12
- wdsnbp.com
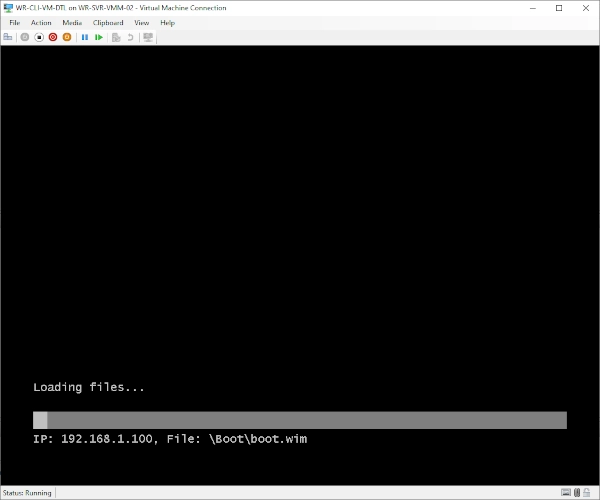
LEGACY BIOS PXE BOOTING
The TFTP server transfer log will show some errors about not being able to find some fonts or secure boot policy files but I found this did not affect anything. If you want to be a perfectionist you can try and iron those out. Now below, here is the process working and loading. I was able to go through the MDT wizard and install an OS.

UEFI PXE BOOT NOTES
If you want to try and get UEFI booting to work here are some things I found.
- DHCP Option 67 would need to be set to:
\boot\wdsmgfw.efi
- This means you will need the wdsmgfw.efi file. I did not see it in C:\RemoteInstall when WDS is installed on a server. After some research apparently the file gets loaded once you import a boot.wim image into WDS. I went ahead and did that, imported a boot.wim from a Windows 10 22H2 ISO, sources folder, and it did indeed appear in C:\RemoteInstall\x64 after that.
Option 66 holds the TFTP address, while option 67 holds the path and name of a NBP (Network Boot Program) to be retrieved from the TFTP server, loaded in memory and run.
The clients inform its pre-os runtime on their DHCP transaction using DHCP option 93
DHCP Option 93 Client’s pre-OS runtime
0 BIOS
6 EFI32
7 EFI64
9 EFI64
This way the DHCP server can provide specific NBPs depending on the client’s pre-OS runtime.Once the NBP is running there’s is a sequence of chainloading (retrieving by TFTP and running) of other components like i.e. pxeboot.n12 and then bootmgr.exe (for BIOS clients) or just bootmgfw.efi (for UEFI clients).
The files bootmgr.exe/bootmgfw.efi will retrieve a BCD that contains (among other things) a “Menu” with all the WIM images available for booting, when the user selects an entry the bootmgr.exe/bootmgfw.efi will TFTP transfer, load in memory, and pass control to the corresponding WIM image. This is how PXE (WDS/MDT/SCCM) works on MS platforms.
I made the Option 67 path change and added DHCP option 93 with an integer value of 9 for x64 EFI and on a Hyper-V Generation 2 VM, it did grab wdsmgfw.efi from the TFTP server when network booting it continuously looks for Windows Deployment Services to respond and errors out. So I tried skipping that file and changing DHCP option 67 to:
\boot\bootmgr.efi
I also edited the BCD to point to winload.efi instead of winload.exe. The TFTP server transfer log shows it’s grabbing the BCD and fonts but still fails to load the boot.wim file with error 0xc0000225. So I feel like I am close yet so far away. I tried many different BCD parameters and I get the same result.
CONCLUSION
Once you understand these things and configure it all, network PXE booting without WDS should be working. If I figure out a way to get UEFI working I will update but for now this is legacy only.
My name is Dex Sandel, author at WinReflection, a blog which aims to help others on various IT and Christian related subjects. DON’T TREAD ON ME! The best is yet to come, and nothing can stop what’s coming!
You all have a greater destiny in Christ, should you choose to ‘follow’ Him, not just believe. Many of you feel lost, without drive, and lack a greater purpose in your life causing depression, sadness, anxiety, and loneliness. Working your 9-5 job isn’t your primary purpose. So, then what is? That’s for you to discover, but hopefully I can provide some new unlocks along your path.
What will ‘you’ do, and what will your destiny be?
John 3:16: For God so loved the world that he gave his one and only Son, that whoever believes in him shall not perish but have eternal life.
Keep up the good work brother! Very nice!
Thanks Scott! :)