Remastering Ratchet Deadlocked | PCSX2
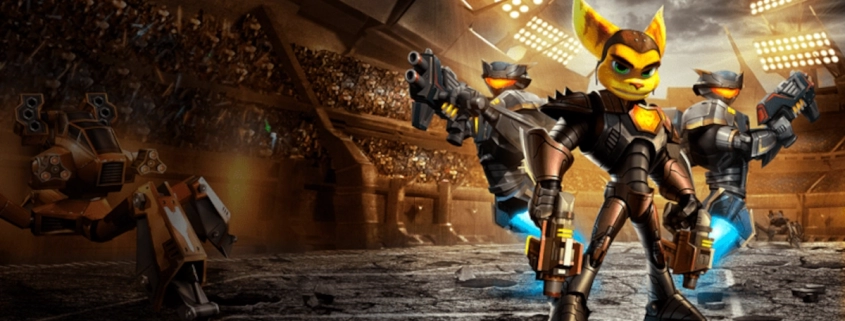
Table of Contents
Intro
Ratchet: Deadlocked was one of my favorite games growing up, and I’ve always wanted to see it fully remastered with modern visuals and smoother gameplay. When this great PS2 game was ported to the PS3 I was excited until it was released because it was broken. All of the glitches it had I was surprised it passed QA to be released.
Now with PCSX2, we can have texture packs, achievements, upscaling and all the other benefits to where the game can be remastered properly.
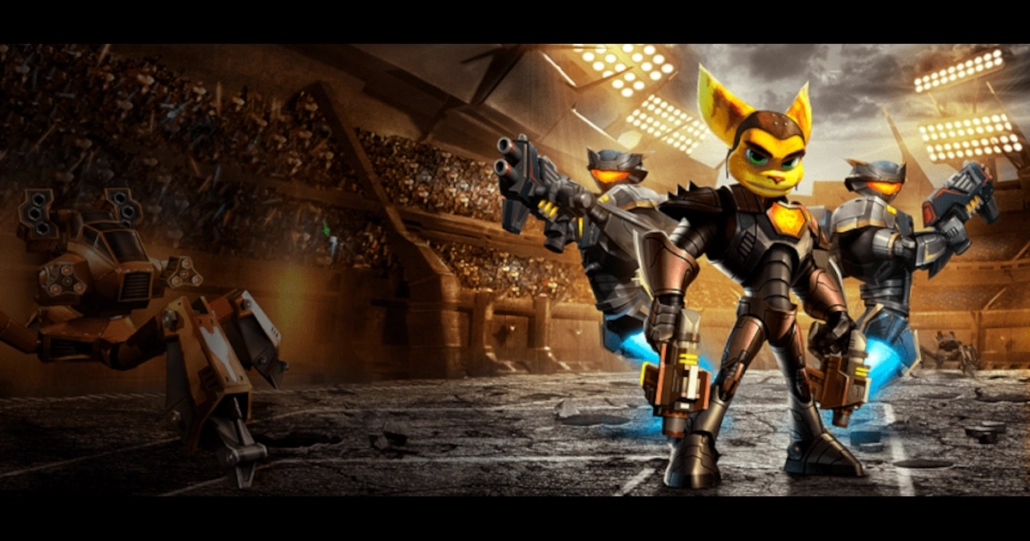
Showcase
It looks amazing and runs better than the PS3 port. I do believe that the Texture Pack is not 100% complete as some textures could be improved or need to be recreated. If you compare this footage to actual PS2 footage it’s night and day difference!
Requirements | Prerequisites
Ratchet: Deadlocked ISO
- You will need a backup copy of Ratchet: Deadlocked, dumped from a legally purchased game.
- Greatest Hits versions of PS2 games sometimes include performance and bug fixes, so consider using that version.
PCSX2 Emulator
- The latest stable version of PCSX2 is recommended for the best performance and compatibility.
- Nightly builds can offer additional bug fixes and improvements.
PlayStation 2 BIOS
- Prefer the latest PlayStation 2 BIOS for performance, bug fixes, and better PCSX2 compatibility.
- The latest North American PlayStation 2 BIOS is SCPH-90001, version 2.30.
- You will need to dump this from your own PS2 or find a copy online.
Ratchet: Deadlocked Texture Pack
- A texture replacement pack is available here for enhancing the game’s visuals.
- The pack can be found on Reddit here or other modding communities.
- The “replacements” folder contains the main textures. Other folders contain optional textures for specific features.
Retro Achievements Account
- Retro Achievements allow you to earn trophies for classic games in PCSX2.
- You will need to create an online account and link it within PCSX2 settings.
Hardware Requirements
- A computer with a capable OS, CPU, and GPU to run the game smoothly.
- A dedicated GPU (NVIDIA/AMD) is recommended for high-resolution upscaling.
Controller Recommendation
- A PlayStation-style controller for a more authentic experience.
- A great option is a controller here with PlayStation layout but native Microsoft (XInput) support for seamless PC gaming.
Installing PCSX2 | Nightly
For PCSX2, we’re going to install the Latest Stable installer version, then replace the executable with the Latest Nightly.
Step 1: Download and Install the Latest Stable Version of PCSX2
- Visit the PCSX2 official website.
- Navigate to the Downloads section and select the Latest Stable Release for your operating system (Windows, Linux, or macOS).
- Download the installer and run it.
- Follow the installation prompts, choosing the default settings unless you prefer a custom installation.
- Once installed, do not launch PCSX2 yet.
Step 2: Download the Latest Nightly Build
- Go back to the Downloads section of the PCSX2 website.
- Scroll down to the Nightly Releases and download the latest version for your OS.
- Extract the downloaded archive using a tool like WinRAR, 7-Zip, or the built-in extractor.
Step 3: Replace the Executable with the Nightly Build
- Navigate to the folder where you installed the Stable Version of PCSX2.
- Locate the pcsx2.exe (Windows) or the equivalent executable file for your OS.
- Copy the new pcsx2.exe from the extracted Nightly Build and paste it into the installation folder, replacing the existing one.
- If prompted, confirm the replacement.
Step 4: Configure the PlayStation 2 BIOS
- Launch PCSX2.
- If this is your first time running PCSX2, it will ask you to configure the BIOS.
- Click Open in Explorer to navigate to the BIOS directory.
- Copy and paste your legally obtained PlayStation 2 BIOS files into this folder.
- Click Refresh List to detect the BIOS files.
- Select the appropriate BIOS version for your region (NTSC-U, PAL, or NTSC-J) and click OK.
Step 5: Set Up Your Game Directory
- In PCSX2, go to Settings > Game List.
- Click Add Search Directory and navigate to the folder where you store your PlayStation 2 game ISO files.
- Click OK, and PCSX2 will scan and list your games automatically.
Step 6: Create a Memory Card
- Go to Settings > Memory Cards.
- Click Create New Memory Card and choose a name and size (8MB is the default, but larger sizes are available).
- Click Create, then select the new memory card and click Insert to assign it to a virtual memory slot.
- PCSX2 will now save game progress just like a real PS2 memory card.
Step 7: Launch a Game and Verify Setup
- Navigate to your game list in PCSX2.
- Double-click a game to launch it.
- Check that the BIOS is functioning correctly, memory cards are working, and gameplay is smooth.
You’re now fully set up with PCSX2 Nightly, your PS2 BIOS, and a working memory card for saving progress! Enjoy your PlayStation 2 games with enhanced performance and graphics! 🚀test Nightly version of PCSX2 while retaining the stability of the full installer setup!
Installing Texture Pack
Step 1: Enable Texture Replacement in PCSX2
- Open PCSX2 and go to Settings > Graphics.
- Under the Advanced tab, find the Texture Replacement section.
- Check “Enable Texture Replacement” to allow PCSX2 to load custom textures.
- Click Apply, then OK.
Step 2: Download and Install Texture Packs
- Navigate to:
C:\Users\%username%\Documents\PCSX2\textures\SCUS-97465
- SCUS-97465 is the game ID for Ratchet: Deadlocked for North American (NA).
- Create the replacements folder:
C:\Users\%username%\Documents\PCSX2\textures\SCUS-97465\replacements- If these folders do not exist, create them manually.
- Copy the extracted texture pack files into the appropriate game folder.
Step 3: Enable Texture Preloading
- Go back to Settings > Graphics > Advanced.
- Load Textures: ✅
- Asynchronous Texture Loading: ✅
Step 4 (Optional): Dump and Edit Game Textures
If you want to edit or upscale textures yourself, follow these steps:
- In PCSX2 > Settings > Graphics > Advanced, enable “Texture Dumping”.
- Dump Textures: ✅ (Optional for editing textures)
- Dump Mipmaps: ✅ (Optional for editing textures)
- Dump FMV Textures: ✅ (Optional for editing textures)
- Start Ratchet: Deadlocked and play for a few minutes to dump the game’s textures.
- Go to folder:
C:\Users\%username%\Documents\PCSX2\textures\SCUS-97465\dumps.- Find the textures you want to edit and modify them using Photoshop, GIMP, or AI upscalers.
Step 5 (Optional): Upscale Textures Using AI
For better-looking textures, use AI upscalers such as:
- ESRGAN (Enhanced Super-Resolution Generative Adversarial Networks)
- Topaz Gigapixel AI
- Waifu2x (Best for Anime-style Textures)
- Real-ESRGAN (Recommended for Realistic Textures)
Step 6: Apply Your Custom Textures
- After editing or upscaling, place your updated textures in the
C:\Users\%username%\Documents\PCSX2\textures\SCUS-97465\replacementsdirectory.- Ensure that the file names match the original dumped textures exactly.
- Restart PCSX2, launch Ratchet: Deadlocked, and check if the custom textures load properly.
Now you have Ratchet: Deadlocked running with high-resolution textures and optimized settings in PCSX2! Enjoy the remastered look of this classic game. 🚀🎮
PCSX2 Performance and Graphics Settings | Ratchet: Deadlocked
Follow these steps to optimize Ratchet: Deadlocked for the best performance and visual quality in PCSX2.
Follow these steps to optimize Ratchet: Deadlocked for the best performance and visual quality in PCSX2. These are the settings that worked best for me. You can right-click Ratchet: Deadlocked in you game list and select “Properties” and adjust the settings below.
Emulation Settings
System Settings
- EE Cycle Rate: 130% (Overclock)
- Enable Multithreaded VU1 (MTVU): ✅
Frame Pacing / Latency Control
- Sync to Host Refresh Rate: ✅
- Vertical Sync (VSync): ✅
- Use Host VSync Timing: ✅
Patches
- Widescreen 16:9 Patch: Enabled
Graphics Settings
Renderer
- Backend: Direct3D 11 or Vulkan
- Direct3D 11 worked better than Vulkan for me.
- Adapter: Your dedicated GPU
Display
- Aspect Ratio: Widescreen (16:9)
- Enable Anti-Blur: ✅
Rendering
- Internal Resolution: 3.5x Native (~1260px)
- Mipmapping: Enabled
Texture Replacement
- Load Textures: ✅
- Asynchronous Texture Loading: ✅
Post-Processing
- Contrast Adaptive Sharpening: Sharpen and Resize (Internal Resolution)
- FXAA: ✅
Recording Settings
On-Screen Display (OSD) Settings
- OSD Messages Position: None
- OSD Performance Position: None
These settings will enhance Ratchet: Deadlocked by improving performance, maintaining smooth gameplay, and delivering higher-quality visuals.
Signing Up for RetroAchievements and Adding It to PCSX2
Step 1: Create a RetroAchievements Account
- Go to RetroAchievements.org.
- Click Register at the top-right corner.
- Fill out the required details, including your username, password, and email.
- Verify your account through the email confirmation (if required).
Step 2: Enable RetroAchievements in PCSX2
- Open PCSX2 and go to Settings > Achievements.
- Check the box for Enable RetroAchievements.
- Enter your RetroAchievements username and password in the respective fields.
- Click Apply or OK to save your settings.
Step 3: Test Booting a Game
- Load a compatible PS2 game that supports RetroAchievements. You can check the supported games list on RetroAchievements.org.
- If set up correctly, a small popup should appear showing the number of achievements available for the game.
- Press F1 (or go to Settings > Achievements) to open the achievements list for that game.
Now you’re all set to earn trophies while playing your favorite PS2 games! 🎮🏆
Recording in Windows
Opening the Xbox Game Bar for Recording
- Press the Xbox button (or
Win + Gon your keyboard) to open the Xbox Game Bar overlay.- Click on the Capture widget.
- Select Start Recording (
Win + Alt + R) to begin capturing your screen.Changing Recording Settings to 60FPS
- Open Windows Settings (
Win + I).- Navigate to Gaming > Captures.
- Under Recorded Video, set:
- Frame rate to 60 FPS (default is 30 FPS).
- Video quality to High for better clarity.
- Enable Capture audio when recording if needed.
Displaying FPS, CPU, and GPU Performance Info
- Press
Win + Gto open the Xbox Game Bar.- Click on the Performance widget.
- Click the Pin icon to keep it visible while gaming.
- Enable FPS, CPU, GPU, and RAM usage display for real-time monitoring.
- If performance metrics are not showing, ensure your user account is added to the Performance Log Users group:
- Press
Win + Xand select Computer Management.- Go to Local Users and Groups > Groups.
- Double-click Performance Log Users and add your account.
- Restart your PC for changes to take effect.
Ensuring Apps & Drivers Are Up to Date
For best performance and compatibility, update the following:
- Xbox App & Game Bar: Open the Microsoft Store, go to Library, and check for updates.
- Intel, AMD, NVIDIA Control Panel Apps: Ensure they are updated via the Microsoft Store.
- Graphics Drivers: Download and install the latest GPU drivers from the official sources:
- Intel Drivers: Intel Driver & Support Assistant
- AMD Drivers: AMD Auto-Detect and Install
- NVIDIA Drivers: NVIDIA GeForce Drivers
By keeping your drivers and apps updated, you’ll ensure smoother recording and gaming performance.
Future Considerations
Texture Dump of the PS3 Port with RPCS3
One potential future improvement for Ratchet: Deadlocked on PCSX2 is leveraging the RPCS3 emulator once it introduces texture dumping functionality. The PS3 port of Ratchet: Deadlocked may have higher-quality textures that could be extracted and implemented into the PCSX2 version for a better visual experience. By using RPCS3’s texture dumping feature when it becomes available, it would be possible to enhance the game’s graphics while staying true to its original design.
ISO Modifications | Upscaling Pre-rendered Cinematics
There are times when the game shows the player pre-rendered video instead the game engine rendering the video in real-time. A way to further remaster the game would be to extract these video files out and AI upscale them for better visual fidelity.
Conclusion
Well that’s it! This was a fun post to make and a fun game to play that brought back fun memories when I was a kid. This is my first post on anything gaming to hopefully bring in a different set of eyes to the blog.
My name is Dex Sandel, author at WinReflection.
I am a Christian, conservative, and truth seeker that is not afraid to be vocal on important or controversial issues, silence leads to death. When a person has that courage the enemy tries to send haters and wolves in sheep’s clothing their way. There are many rewards earned in Heaven for those that refuse to give up. There’s more to life than the worldly status quo and that’s why many are sad and depressed, they’re suffocating! Truth and purpose can bring fresh air into one’s life and that’s my mission.
The best is yet to come, and nothing can stop what’s coming!
John 3:16: For God so loved the world that he gave his one and only Son, that whoever believes in him shall not perish but have eternal life.
Leave a Reply
Want to join the discussion?Feel free to contribute!