
Dell iDRAC | Configuring Alerts | SMTP Woes

Table of Contents
Intro
Working in the MSP field, you may need to set up alerts via SMTP. If your client uses Google Workspace or Microsoft 365, you’ll typically create a dedicated alerts email (e.g., [email protected]), which requires a paid license. Even with proper setup, SMTP alerts may still fail.
For clients without enterprise email or unwilling to pay for an extra license, getting SMTP alerts to work can be even more frustrating.
Fortunately, SMTP2GO solves these issues. It offers 1,000 free emails per month, ideal for small businesses. I’ll show you how to configure SMTP2GO for use with iDRAC.
Prerequisites
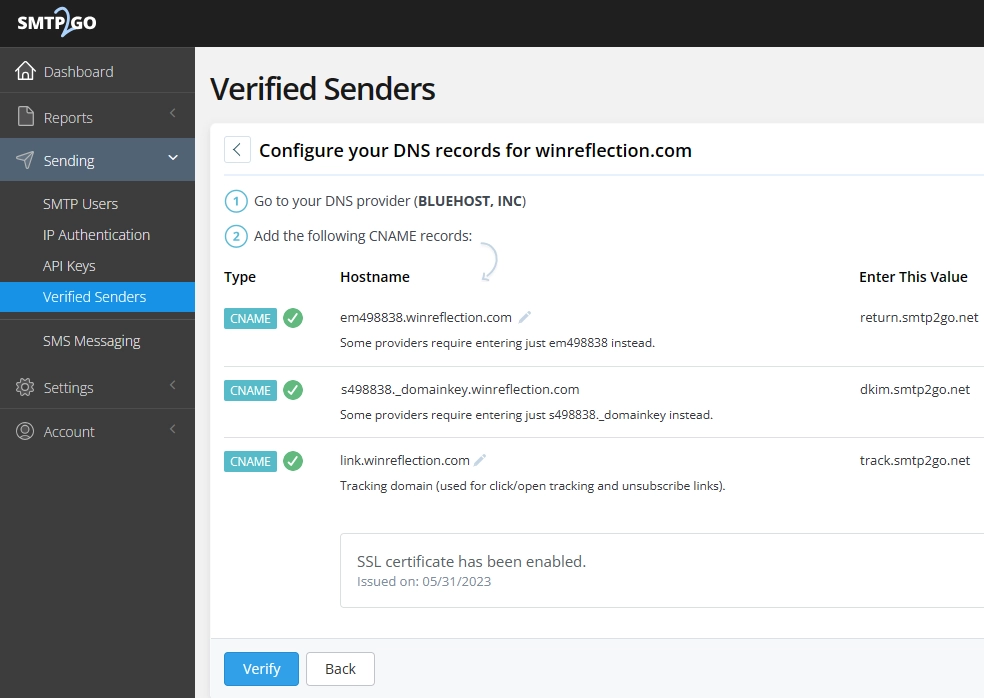
We will be using a purchased domain for this guide, which is mine, winreflection.com for the verified senders. This is so I can send alerts with users having my domain ending in winreflection.com. SMTP2Go requires DNS records to be added to the domain for authentication. You will need to know the provider of the primary name servers your domain is configured to use as that will be where the DNS records are looked for.
To do this do a WHOIS domain lookup here.
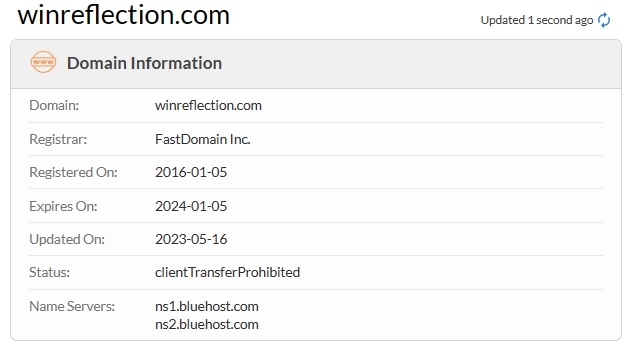
As you can see from my own lookup, the registrar is FastDomains Inc., which is operated by Bluehost, and Bluehost is where I have purchased my domain and where it’s renewed. The name servers below:
ns1.bluehost.com
ns2.bluehost.com
Since the domain points to Bluehost, I’ll log in there to manage and add the SMTP2GO DNS records. If you’re unsure who owns the name servers, run a WHOIS lookup to find out.
Once you have DNS access, use MX Toolbox to perform a domain health check. Fix any errors ASAP, especially those related to SPF, DMARC, DKIM, and MX records, as these impact mail flow and security.
For team use, register the SMTP2GO account with an admin email (e.g., [email protected]) instead of a personal one. Also, use a password manager like Bitwarden to securely store MFA codes and cycle them as needed.
Check Domain Health
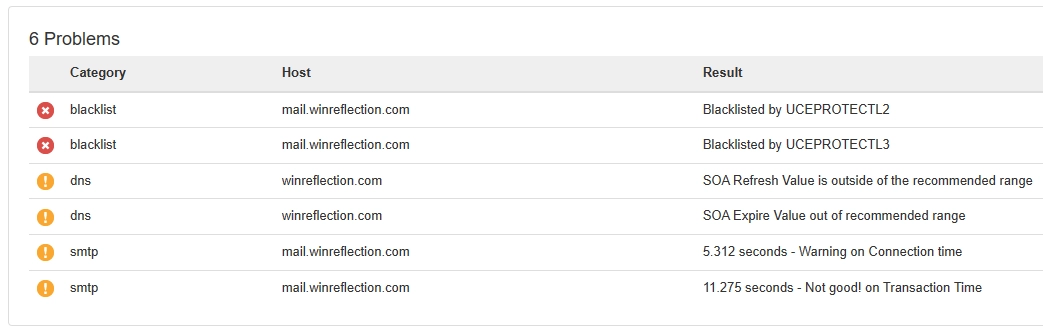
As you can see from my own domain health check I have some issues that I can’t fix. The ones in orange are set by Bluehost and unchangeable. It might be possible to contact Bluehost directly to adjust some of them. The ones in red mean my email server is on some blacklists. This can be bad because many email providers use these blacklists to check email domains for safety, and if a domain is on them, they can use that as justification to block your emails from being delivered or send them to spam/junk folders.
From my domain health check, I found issues I can’t fix—orange warnings are set by Bluehost and unchangeable, though contacting them may help. Red warnings indicate my email server is on blacklists, which can hurt email deliverability by causing messages to be blocked or sent to spam.
In my case, UCEPROTECT blacklisted a block of Bluehost IPs, including mine, due to malicious activity from other users. They demand a fee to remove the block, but it’s likely to reappear, making this feel like a pay-to-remove scam that punishes innocent users.
The only real solution is to switch email providers and update my MX records to avoid Bluehost’s blacklisted IPs—highlighting the importance of choosing a reliable provider.
Add Verified Senders
Adding a Verified Sender in SMTP2Go
- Log in to SMTP2Go
- Go to SMTP2Go’s website and sign in to your account.
- Navigate to Verified Senders
- In the dashboard, click on Settings in the left-hand menu.
- Under Sending, select Verified Senders.
- Add a New Verified Sender
- Click on the Add Verified Sender button.
- Enter Sender Information
- Email Address: Enter the email address you want to verify as a sender (e.g., [email protected]).
- Sender Name: Optionally, enter a display name for the sender (e.g., My Business Alerts).
- Verify Your Sender Email
- SMTP2Go will send a verification email to the provided email address.
- Check your inbox for the verification email and click the verification link.
- Confirmation
- Once you’ve clicked the link, your email address will be added as a verified sender in SMTP2Go.
- You’ll now be able to send emails from this address using the SMTP2Go service.
- Save Changes
- Your verified sender is now ready to use for outgoing emails!
Creating Your First SMTP2Go User
- Log in to SMTP2Go
- Go to SMTP2Go’s website and sign in to your account.
- Navigate to User Management
- In the dashboard, go to Account → Users.
- Create a New User
- Click Add User to create a new SMTP2Go user.
- Choose a Unique Username
- Usernames must be unique, so I recommend including your domain name in the username to ensure it’s exclusive.
- Example: [email protected] or [email protected].
- Set a Strong Password
- Enter a secure password for the new user.
- Assign Permissions (Optional)
- If needed, assign appropriate permissions for this user (e.g., access to certain email addresses or logs).
- Save the New User
- Click Save to create the user.
Configure iDRAC Settings
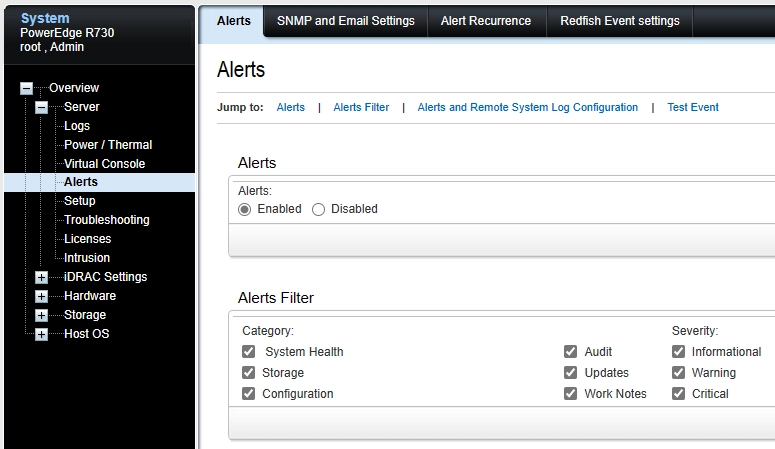
Enabling Alerts in iDRAC
- Log in to iDRAC
- Open a web browser and enter your iDRAC IP address.
- Sign in with your administrator credentials.
- Navigate to Alert Settings
- In the left-hand menu, go to Overview → Alerts.
- Enable Alerts
- Ensure that Alerts are enabled.
- Select Alert Categories
- Choose the hardware event categories you want to receive alerts for (e.g., temperature, power, storage, etc.).
- Save Your Settings
- Click Apply to confirm your changes.
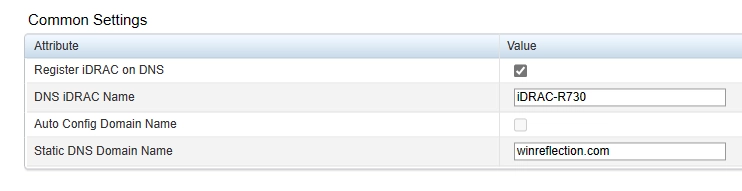
Configuring Network and DNS Settings in iDRAC
- Log in to iDRAC
- Open a web browser and enter your iDRAC IP address.
- Sign in with your administrator credentials.
- Navigate to Network Settings
- Go to Network → Common Settings.
- Enter Network Information
- Fill in the appropriate network settings, ensuring accurate IP address, subnet mask, and gateway configuration.
- Enable “Register iDRAC on DNS” to allow proper hostname resolution.
- Configure DNS Servers
- Set a reliable DNS server that can access the internet, such as:
- Google DNS:
8.8.8.8- Cloudflare DNS:
1.1.1.1- Avoid using a gateway or local relay for DNS, as it may cause routing issues for alert emails.
- Save and Apply Changes
- Click Apply to confirm your settings.
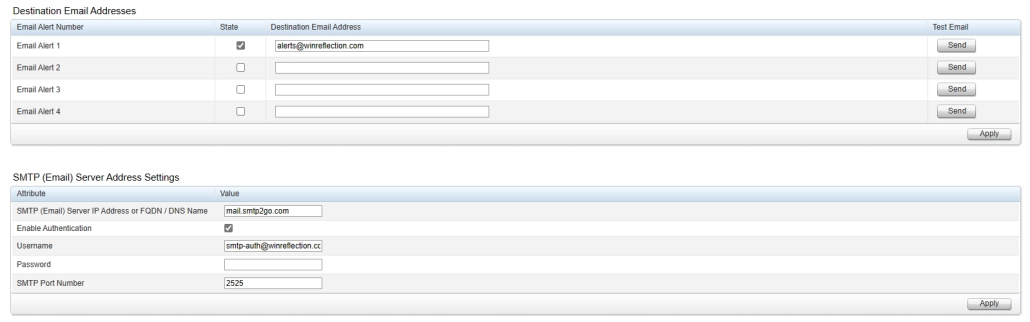
Configuring SNMP and Email Alerts in iDRAC
- Log in to iDRAC
- Open a web browser and enter your iDRAC IP address.
- Sign in with your administrator credentials.
- Navigate to Email Settings
- In the left-hand menu, go to Overview → Alerts → SNMP and Email Settings.
- Enter Recipient Email
- In the Email Recipients section, enter the email address where you want to receive alerts.
- Configure SMTP Settings
- Enter the SMTP2GO server information as follows:
- SMTP Server Address:
mail.smtp2go.com- Port:
587(for TLS) or465(for SSL)- Encryption: Select TLS or SSL, depending on your SMTP2GO configuration.
- Sender Email Address: Use the email you registered with SMTP2GO.
- Enter SMTP2GO Credentials
- Username: Your SMTP2GO account email or API username.
- Password: The SMTP2GO password you set up.
- Save and Test
- Click Apply to save the settings.
- Send a test email to ensure alerts are working correctly.
Verify Delivery Success
Verifying Email Delivery in SMTP2GO
- Log in to SMTP2GO
- Go to SMTP2GO’s website and sign in to your account.
- Navigate to the Activity Tab
- In the dashboard, go to Activity → Delivery Log.
- Check Email Status
- Look for the sent alerts and verify if they were delivered successfully.
- You can see details such as timestamps, recipient addresses, and delivery statuses.
- Troubleshoot Issues (If Needed)
- If an email fails, check the error message for clues (e.g., authentication issues, blacklisted IPs, or recipient rejection).
- Adjust your SMTP settings in iDRAC if necessary.

Conclusion
SMTP2GO has been a game-changer, reliably working on every device I’ve set up for alerts. It’s perfect for scan-to-email on printers, firewall alerts, config backups, and more. No more SMTP headaches—just seamless email delivery and peace of mind.
My name is Dex Sandel, author at WinReflection.
I am a Christian, conservative, and truth seeker that is not afraid to be vocal on important or controversial issues, silence leads to death. When a person has that courage the enemy tries to send haters and wolves in sheep’s clothing their way. There are many rewards earned in Heaven for those that refuse to give up. There’s more to life than the worldly status quo and that’s why many are sad and depressed, they’re suffocating! Truth and purpose can bring fresh air into one’s life and that’s my mission.
The best is yet to come, and nothing can stop what’s coming!
John 3:16: For God so loved the world that he gave his one and only Son, that whoever believes in him shall not perish but have eternal life.
Leave a Reply
Want to join the discussion?Feel free to contribute!